Connecting Deltek Vision e-mail to Office 365 – I first wrote a blog article on connecting Vision to Office 365 around 4 years ago. At the time Vision didn’t support a direct connection to Office 365 for sending e-mails. This was due to the fact that Vision only supported insecure SMTP (port 25) connections that didn’t require user authentication while Office 365 only supported secure (TLS) connections on port 587. The purpose of that blog post was to help users set up an internal SMTP relay that took the anonymous messages from Vision and then relayed them securely to Office 365.
This was essentially a work around that had been used for sometime to handle multi-function devices such as copiers and scanners that needed to send files to Office 365 e-mail accounts. If you’re on Vision 7.2 or lower this may still be of interest to you and you can read that post here. Since version 7.3 however, Vision began to support a direct connection to Office 365 for e-mail and I thought that interest in this topic would fade. To my surprise my original post is still to this day one of the most searched and read articles. I commonly receive messages from people who have read it looking for help but as it turns out its not for setting up an SMTP relay on older versions but rather for connecting directly from versions 7.3 and higher to Office 365!
So as it turns out many users are still having difficulty getting the set up correct in large part because Deltek doesn’t provide much documentation on the setup in Vision and even less on the Office 365 side. There is one Deltek KB article (#79773) which explains how to troubleshoot connectivity errors but is not really a how to. If you find yourself in this situation then this article is for you. I have provided a detailed step by step below.
Setting up Vision First:
Before you begin, or if your current setup is not working, start with the Vision configuration. Below is a numbered screen shot of the set up screen when you go to Configuration–>General–>System Settings–>E-mail tab. Explanations of each follow.
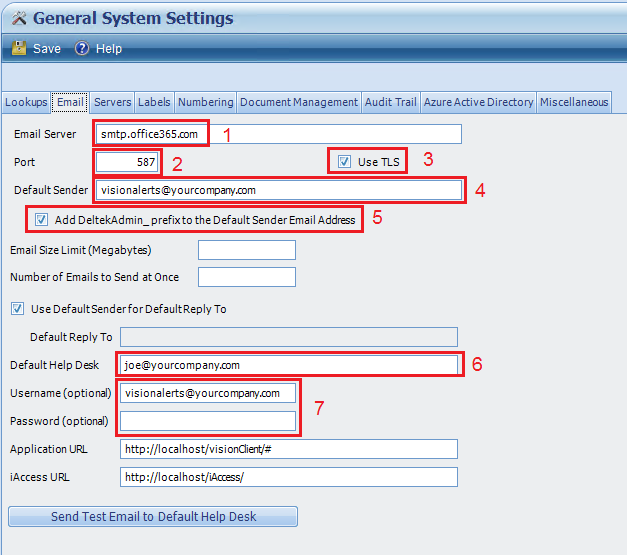
- Email Server – This is the server address that you are sending your e-mail to. For Office 365, unless you have been given a different address by Microsoft should always be smtp.office365.com.
- Port – Should always be 587. This is a reserved outgoing SMTP (Simple Mail Transfer Protocol) port for use with TLS security and is recommended by Microsoft when connecting to Office 365.
- Use TLS – TLS (Transport Layer Security) is a protocol similar to SSL (Secure Sockets Layer) for securing transmissions over the Internet. This should always be selected.
- Default Sender – This is the e-mail address that will be sending all Vision e-mails (alerts, reports, etc.). The address you use here must be a valid Office 365 e-mail address and you must know the password. Most people prefer to have a generic address dedicated to sending e-mails. If you already have one for sending from other applications or from multi-function devices you can also use that but it can be helpful to distinguish Vision by having a Vision specific address such as [email protected].
- Add DeltekAdmin_ prefix to the Default Sender Email Address – This is probably one of the least understood settings here and it’s not explained very well in the help or the warning message you get if you un-check this. In a nutshell its an added security measure to allow the recipient (who might be outside of your organization) to verify the sender. Some e-mail systems require the sender address to match the sender authentication in which case you could remove the prefix. For Office 365 we leave this checked and there is actually a bit more to this which we will explain more when we get to the Office 365 set up.
- Default Help Desk – This is the email address in your organization that will receive any test messages you send from this configuration screen as well as the person who will receive any error messages. When a Vision user encounters an error they have a prompt to send the error details and it will go to this person. For the purposes of testing this setup its a good idea to set this to your own address, if only temporarily, so that you can confirm you are receiving the e-mails.
- Username / Password – This is self explanatory but to be clear, for Office 365 this should be the e-mail address and password of the account you entered in Default Sender. This has to be a valid Office 365 email address and you must know the password.
Office 365 Setup:
Before we can try our first test, we have to make some changes to Office 365. You must have sufficient rights within your Office 365 Admin portal to perform the steps that follow. Your level of access and the exact steps may not be exactly as outlined here but this should get you close.
Understanding the DeltekAdmin_ Prefix:
The first thing to understand is that there are actually 2 Deltek aliases which we will need to setup in Office 365 for the account we used as the Default Sender:
- DeltekAdmin_ – this alias is used by most parts of the system – scheduled alerts, errors, and when e-mailing reports to people.
- Deltek_ – this one is used only for email sent by the Invoice Approval engine and for Billing Transfer alerts.
Not all users will need the second alias but its a good idea to add it now so you don’t have to revisit this later.
Adding the Aliases:
We need to add the above to “prefix” aliases to our Default Sender e-mail account:
- From the Office 365 Admin Console go to the Exchange Admin Center.
- Select Recipients from the left side menu
- Double click on the default sender account (if you have a lot of addresses you may need to search for it)
- From the Edit User Mailbox pop up window select email address from the left side menu
- You should see something like the screenshot below. To add the 2 aliases seen in the red outline click on the plus sign
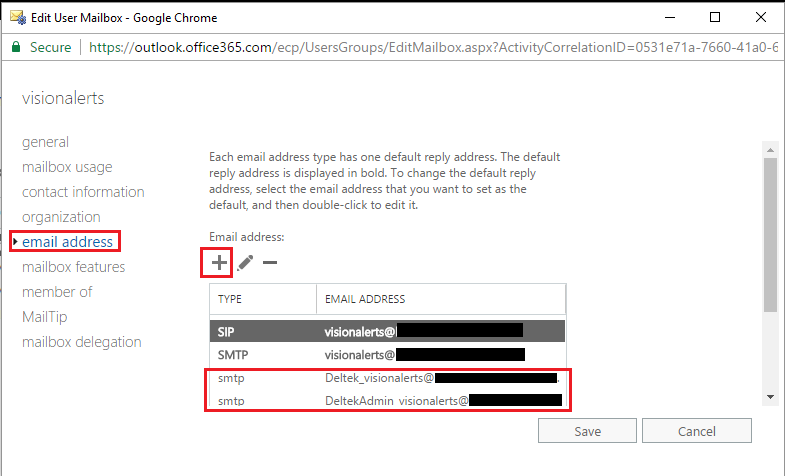
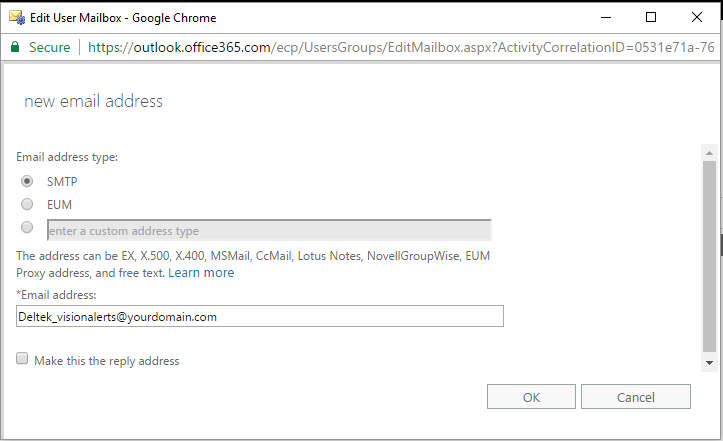
After clicking the plus sign you can then add the 2 new aliases from the pop up window. You will need to do this once for [email protected] and [email protected]. Note that you will need to substitute [email protected] with the address you entered in Default Sender earlier.
First Test:
Now that you have entered the 2 required aliases and if you have set the Default Help Desk to yourself or an address you have access to, you can go ahead and hit the Send Test Email to Default Help Desk button in Vision now. You should receive the test e-mail in a matter of a few seconds. If you do not receive any errors and do not receive the e-mail check your junk/clutter folders.
If you receive any error messages, double check your settings both in Vision and Office 365 and try again. If any errors persist, there could be an issue with the e-mail address you are using. You can try logging into Outlook online using that account to make sure you have the correct password. Also allow some time after creating the aliases as I have found Office 365 can take a few minutes before allowing the flow of e-mail using the aliases.
Last Step:
After performing all of these steps, most think there is nothing else required until one of their users comes up and says I can’t e-mail reports! You will likely be seeing an error that says: Mailbox unavailable. The server response was 5.7.60 SMTP: Client does not have permission to send as this sender.
This error will likely be familiar to those with Exchange or Office 365 Admin experience but not so much to others. The reason we get this message is because when a user e-mails a report its trying to send it as that user. It’s actually trying to use whatever e-mail address the currently logged in user has entered in their Employee Info Center record. This is so that the recipient of the e-mailed report will see that user in the email Display Name. The problem with that is Vision is configured to send all mail using the account we just configured.
In order for this to work we need to go back into Office 365 and make our Default Sender account a Delegate for each and every e-mail account that is tied to a Vision user who may want to e-mail reports. I will explain the steps to do this manually for a single e-mail, however you may need to do this to potentially hundreds of addresses so I will show how to do that at the end.
Add Delegate for One E-mail:
- From the Admin Console double click on the e-mail address
- From the Edit User Mailbox pop-up, select mailbox delegation (last item on left)
- Under Send As click the plus sign
- From the Select Send As pop up dialog, double-click the Default Sender address you want to add as a delegate to your user’s e-mail.
- Hit OK then Save. Give the system time to update and then try sending a report from that user. The Send As privilege can take as much as 10-15 minutes before it starts working.
Add Delegate for Multiple E-mails:
- From the Admin Console using ctrl-click or ctrl-shift click to highlight all of the addresses you want to add the delegate to
- On the right hand menu you will see Bulk Edit. Scroll to the bottom and click More options
- Scroll down some more and you will see Mailbox Delegation. Click Add.
- From the Bulk Add Delegation pop up dialog, click the plus sign and double-click the e-mail of your Default Sender address you want to add as a delegate to all of the e-mail addresses you just selected.
- Hit OK then Save. Give the system time to update and then try sending a report from one of those users. The Send As privilege can take as much as 10-15 minutes before it starts working
An experienced Office 365 Admin can also do these updates using PowerShell scripting and if you have one in your organization you may want to discuss additional ways to maintain these changes as users join and leave your organization.
Conclusion:
While this article is quite lengthy, the intent was to provide a very concise guide so you’re not spending too much time getting this working. The actual time to set this all up is relatively short. Hopefully this blog post will save some of you from pulling your hair out for days trying to make what should be a simple task work!
If you have any questions drop us a line at [email protected]