Overview
Deltek Vision Sandbox Best Practices
Creating a Sandbox or test environment for those with an on-premise Vision system is a relatively straightforward process provided you are familiar with working with SQL Server and understand how the Weblink utility works. Deltek First cloud customers must go through Deltek support to have Sandbox environments added to their system.
Unfortunately we frequently encounter clients who make some common mistakes setting up their Sandbox environments and this can lead to big problems such as end users entering information in the Sandbox that was meant for the Production database or the opposite where testing work is done by mistake in the Production database. Another issue could be doing extensive testing in the incorrect Sandbox if you have more than one.
Best Practices
For this post we won’t get into the details of backing up and restoring databases as this process can vary between SQL versions and may or may not be something that many Vision users will have access to. If you require going through your IT or Database team you can still have them follow some of these guidelines for that part of the set up. We will also assume that you have access to, and understand how to use the Weblink Utility.
You can create as many Sandbox environments as required and you’re really only limited by your server resources.
1. Database Setup
Regardless of whether or not you will be managing the database backup and restore process, make sure that all Sandboxes follow a standard naming procedure that helps you easily identify the database. Typically you will make a current backup and restore it with a new name. Consider appending the original database name with “_Sandbox_20170601” whereby the number represents the date of the restored data set. If you are making more than one Sandbox consider including a numeric descriptor or short description of the purpose of the Sandbox such as:
“Vision76_Sandbox_1_20170601” or “Vision76_Sandbox_RevGen_20170601”
2. Weblink
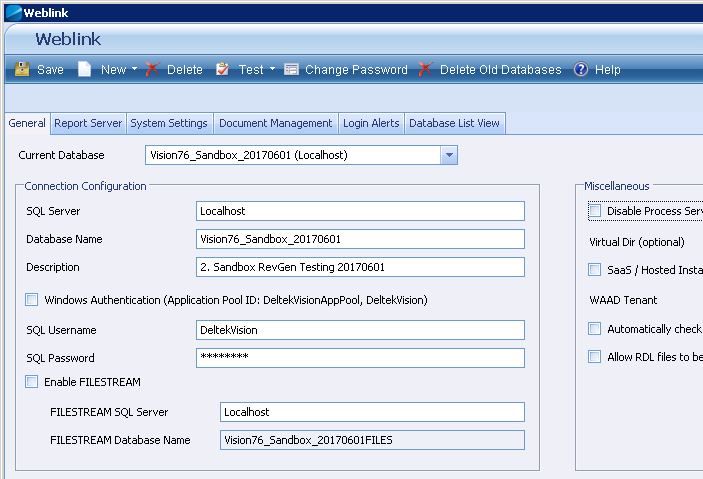
Weblink is a utility that resides on the Vision server (Web Server in multi-server environments) and is how we add new databases to the database drop down on the Vision login dialog.
There is no real limitation on how many databases you can have on the login dialog however, keep in mind that you also cannot restrict who sees which databases on the drop down – everyone can see all available databases. This is why a good naming convention in Weblink is important.
We like to number our databases in Weblink so that we can control the order they appear in the drop down. We can also be a bit more descriptive in naming. Using the above example and assuming we have 1 Production and 1 Sandbox database you might do something like this:
1. Production (Live)
2. Sandbox – Rev Gen Testing – 20170601
This will quickly alert you users that the 2nd database is for testing and for the testers they know that the data set was created using a back up from June 1, 2017. We prefer to use the date the backup was created rather than the date the Sandbox was setup. A subtle distinction but potentially an important one. For example you may want a data set that ends on the last day of the month, but the Sandbox isn’t actually set up until a week later.
Note: Your live database should always be the first database in the list.
3. Securing the Sandbox
We see a lot of systems where Sandboxes are not locked down and this can lead to all kinds of issues. Consider these scenarios:
- End users accidentally log into a Sandbox and go about their normal business entering time and expenses, or posting AP Vouchers, etc. They could potentially waste hours entering data to the non-production environment.
- Someone who is assigned to do some testing in the Sandbox accidentally logs into the Production database and makes potentially devastating configuration or posting changes by accident to the live system.
- Someone assigned to do testing based on current data logs into an older Sandbox and wastes time performing tests on the wrong data set.
These are just a few examples that can cause very serious problems and emphasizes why we should always lock down a Sandbox database.
The very first step after adding a Sandbox to Weblink should be to go into Configuration–>Security–>Users and Disable all users (don’t worry you cannot accidentally disable the user that you are logged in as). Then individually re-enable ONLY the users that require access to the Sandbox.
4. Update The Firm Name
This last step is one many users do not adhere to and we feel is very important. When you look at your web browser frame you will see your company’s name along side the current ending period.
By changing the Firm Name to match your Sandbox name you give your end users a quick visual way of knowing if they are in the Sandbox or the Live system. Often someone doing testing in a Sandbox may need to jump back and forth between databases and this is a helpful way for them to keep track of which database they’re currently in.
Go to Configuration–>General–>Company Settings and change the Firm Name to match the Sandbox name. We also find it helpful to use a visual indicator like multiple asterisks on either side of the name to identify it. Using our previous example you might use:
**** Sandbox – RevGen Testing – 20170601 ****
Note: The Firm Name has a 42 character limit!
Summary
By following a few simple guidelines and naming conventions you can avoid some very easily preventable data corruption issues and also save your staff some stress along the way!
If you would like more info or would like assistance setting up your Sandbox environments contact us at in**@***************ns.com

